![]() CBA Concepts: Billing Automation
CBA Concepts: Billing Automation
1. Navigate to the Billing Program to which you would like to add Schedules.

The Billing Center displays a list of all Billing Programs.
2. Click Add a schedule or Add a group of schedules.
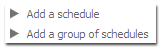
Add a schedule allows a user to add one Schedule to the billing program.
Add a group of Schedules allows a user to add a group of Schedules to the Billing Program.
![]() When adding a group of Schedules, CBA allows the user to enter one set of dates to be used for all Schedules. For example, if a Finalization date of 8/1/2008 is entered for a group of three Schedules, CBA will use 9/1/2008 and 10/1/2008 for the second and third Schedules' Finalization Date.
When adding a group of Schedules, CBA allows the user to enter one set of dates to be used for all Schedules. For example, if a Finalization date of 8/1/2008 is entered for a group of three Schedules, CBA will use 9/1/2008 and 10/1/2008 for the second and third Schedules' Finalization Date.
3. Choose the Schedule Dates. If you are adding a group of Schedules, choose the Schedule periods and number of Schedules.
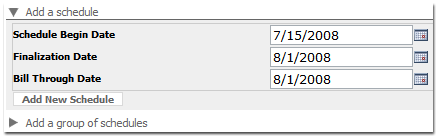
Select a Schedule Begin Date, Finalization Date, and Bill Through Date.
Schedule Begin Date: the date that the automated billing system begins producing transactions.
Finalization Date: the date the current batch is finalized. No new transactions may be included in the current batch. Please note, however, that a new batch may be created before the next Schedule begins that includes additional transactions.
Bill Through Date: the date the automated billing system will bill through. For example, to run a bill for the month of July, the bill through date would be 08/01/2008.
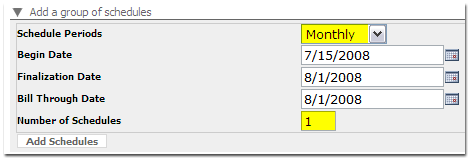
If you are adding a group of Schedules, use the dropdown menu to select the Schedule Periods and Number of Schedules.
Schedule Periods: CBA allows users to select Monthly or Weekly Schedule Periods
Number of Schedules: users can enter any number of Schedules to add in the group
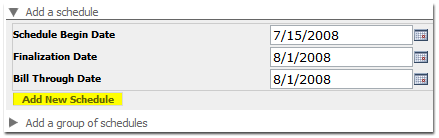
4. Click Add New Schedule to add the Schedule(s).
5. Verify Schedule setup.

Verify that the Schedules have been set up correctly.
![]() If necessary, Schedules can be removed by clicking the Remove link to the right of the Schedule.
If necessary, Schedules can be removed by clicking the Remove link to the right of the Schedule.